Friday, January 27, 2012

Friday, Friday, Gotta get down on Friday . . . and all weekend long

First of all, happy freaking Friday!  ("Friday, Friday, Gotta get down on Friday . . .", if you don't know this reference, look up, super annoying song by super annoying teenage girl).   I'm stoked that I got through another week of work-work, so I can spend time doing my fun-work over the weekend.  Not totally sure what is in the works yet, but here are a few "loose plans":

1. Pick up my vintage Pik-Nik cooler from Crescent Hill Trading Company !  You may remembered when I adored it (almost embarrassingly) on this post.  Thanks to owner Kathy Schmitt for helping me achieve my dream of ownership!


2. Picking up some chairs I found on Craigslist.  They are Vintage school chairs, stackable, and will make an awesome industrial vintage touch around a dining table.  Buying these to sell in my booth once it's up and running.  I had to buy all 11 of them, but got a great deal - don't think I'll have any problem selling them and making a bit of moolah.  Parting with them, that's the tough part.


3. Finish my hook rack for hanging coats and backpacks.  I've been working on this for weeks.  I took down this coat hook wall:


My intial idea was that I wanted something more interesting than a standard coat rack from Home Depot or something (Hubby chuckles as I confirm his mantra that I don't ever pick anything "normal").   But, in reality, when you actually hang things on said interesting coat hook wall, you can't see them and it's not very functional.  If you're saying "Duh" then we're not friends anymore.  I don't know why I didn't think of that.  But here's how it actually looks when in use:


So, I've taken all the hooks off the wall and will be screwing them to these pretty large wood "planks" that I had cut at Home Depot, then I stained:


I spent some of my crafty time last weekend adding some paint to some of the hooks that were darker and showed well on the white wall, but not so much on these darkly-stained boards:
This was a brown/bronze color, I wiped on some silver paint.
Froggy hook was brown/bronze, rubbed on some green paint
and added some blue spots and eyes.


4. Sew (or fake sew) a small curtain to put under my bathroom vanity.  You should be super excited, because sometime soon I'm going to show pix of my super totally big time vintage PINK BATHROOM.  It looked kinda like this when we moved in, but maybe a smidge less Pepto, just a smidge:


I loathed it when we moved in, got used to it over time, and now kind of dig the charm.  There is an entire website devoted to love for pink bathrooms: Save The Pink Bathrooms Website.  I have jazzed mine up a bit with some black and white accents, better than the floral wallpaper when we moved in.  Anyhoo - I want to add a bit more fabric, texture, and pattern with a small curtain below the vanity top.  Something kind of like these, but a bit different scale:


5. Work through laundry hell.  Although Grandma was in town this week (WOOT) and my laundry is looking up.  Now I just need to put it away. 

6. Jonesing to paint something!  Weather has been super crappy, wet, cold - not ideal for painting in my garage.

So those are all the things I want to do, but the following is a list of what I have to do:
Boot Camp Saturday morning - BLECH, B-Ball game for a kiddo, Baby shower for my wonderful and long-time friend Ramona expecting her first!, hitting the Boat & RV show, play in my volleyball league, clean the house.  Hmmmmm, maybe my to do list is too long above.

What are you up to this weekend?

Wednesday, January 25, 2012

I am an AR-TEEST

Soooooo, got my artist hat on this Sunday.  Big kids were out of the house with the Hubs for a couple hours and Max was down for a nap.  Two hours in the clear - yesssssssss.  I had some plaques that I bought at Michael's years ago for like $2.  Decided to sit down with some teal paint and go to town.  I started with the dark color across the top third, then mixed some lighter teal into the paint for the middle area, then added a bunch of white for the bottom.  I then took a dry brush and blended the areas.   Here is what I came up with.
Getting started


Finished product before it dried - I like it shiny.


Finished product dried. I think it needs a glossy coat.


And just so you know, this is what my house looks like over the weekend when I'm working on several projects.  Note the dining room table is covered in paint supplies, the chairs had the cushions taken off.  Plus, still hadn't taken all the Christmas decor downstairs.

More chaos as the kids got in the act to paint, too.  Some nice work me thinks:


But later in the evening the dining room came back together and looked like this.   Ahhhhhh, I can go to sleep now.

Monday, January 23, 2012

Pick your seat!

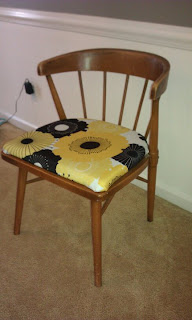
Sooooooo, on Friday I had a long list of DIY projects I was planning for the weekend.  Well, as is usual, I didn't get to everything I planned, but I did do two extra projects I wasn't planning, so I say SUCCESS!  First project to share are my recovered dining room chairs.  These are vintage 1960's delicious maple chairs.  My aunt Barb and her husband Chris gave them to me, they belonged to his dad.  I love furniture with history, it makes things so much more special!  So, I got them about a year ago and recovered the dingy guacamole colored seat cushions in a bright and eye-catching yellow/black floral pattern.  Actually the fabric for that make-over was a $7 Clearance shower curtain from Target.
Original
Make-over #1

I really enjoyed that pattern and the punch of color.  When I did this, I think the room was white with nothing on the walls, no painted furniture, etc.  Now, it's just a bit too much.  A while back I found this great large houndstooth fabric and knew I wanted to recover the chairs with it.  Houndstooth on it's own is a very traditional pattern, but the large over-sized pattern on this fabric makes it more modern and fun.  Plus, I have lots of splashes of black and white in my dining room and living room, so it's a nice add.  Black and white always add a bit of formality.  This is a heavy duty "cotton duck" fabric.


Another reason to recover the yellow/black pattern is that they had gotten pretty dingy - we eat in there (I know - in a dining room, crazy!), we do art projects, school projects, paint, etc.  So, these get lots of wear.  Which is why I added a coat of Scotch Card fabric protector to the seats when I finished them. I'm going to do another couple coats.  And at the end of the day, total cost for this project was around $15 for fabric, so if they get ruined somehow, I'll just recover them again.  See my dingy before cushion.


If you've never recovered padded seat cushions before, try it, it's super easy.  See the steps below.  I use a regular old staple gun from Home Depot.  They are cheap and handy for lots of projects!  If you're not sure which one to buy, just tell the guy in the orange apron what you need it for, and they'll direct you to the right thing.
First, unscrew the screws that hold the seat to the frame.
You can see two at the top and two on the bottom corners.
Cut your fabric to where you can pull it over the pad on
each side by about 2-3 inches.(note, I pulled off the yellow
and black fabric first b/c I was afraid it would show through)


Next pull fabric tight (not super tight) and staple it to the
seat. Start with one staple, then the side across from it, and
so on so that you have it stapled first in each direction. Don't
forget to somehow mark where the screw holes are, I use
a ballpoint pen to puncture through to keep the spot.


Finish stapling all around, being careful to not have any
areas that pucker. On the corners, the more staples the better.


Make sure to keep pulling and stapling at the corners
or you will get a "bunchy" look that you won't like!


It's also kind of cool to see what other fabric was there before.  There are two fabrics on the seats underneath the one I just put on.
Looks like the brown/gold weave fabric was the original.
(excuse my chunky monkey fingers in this photo)


Now for the fun part, TA-DAHHHHH:
BEFORE
AFTER


BEFORE
AFTER


More AFTERS (because I adore, love, have tears in my eyes over these chairs and I am trying to take more pictures with my camera!)


Max trying out the new chairs


This is truly a project that ANYONE can do, and look at the result - I love projects like this that makes you so happy when you're finished.  I went back in the dining room to see them about 10 times last night.  And staple guns are fun.  HAVE A GREAT WEEK!

Friday, January 20, 2012

Weekend Plans

Hola, yo estoy muy feliz porque es Viernes.  I used to say this every Friday in Spanish class, and evidently it means I'm very happy because it's Friday!  AMEN SISTA.  Been a crazy week at work, and ready for some downtime.  Although my downtime is usually really up-time, but I'm up doing things I love.  So, thought I'd fill you in on the weekend's projects!

#1 - Fix front hallway hook museum debacle
So, my front foyer is where the kids drop all their crap (as previously mentioned here).  Earlier this week I provided some relief to the mail and paper piles.  Now it's time to tackle the coats, scarves, backpacks, lunch bags, etc.  Last year I had the brilliant idea to do a art-installation-type coat hook on one of the walls in the foyer.  I mean, why be so predictable and actually use a regular old coat hook?  Here's how that turned out:


As you can see, there are lots of types of hooks, most were meant to represent something about the people in our family (ie, my daughter's tiara hook, my son's frog hook) or something important to us (ie, dog bone for our dogs, cardinal bird that reminds me of my Grandma).  And I was going to actually put frames around each to make it an art installation.  I did this in the summer.  So, no coats around.  So, this is what my wall looks like in actual practice:


Or this is how it looks from the front door:


So, as you can see it's a MESS.  So, I've got two long 10" x 1" blanks that I've stained in a dark finish.   Plan for this weekend is to take down all of these hooks and spray paint them white.  Some of them will mkae the cut, some will be replaced.   They will be drilled onto the two planks of wood and then drilled into the wall in another hallway just off the foyer.  The main reason I will be replacing a couple of the hooks is that they stick out kind of far, and afraid about people walking into them in the new placement.  So, part of me wants to get all matching hooks (Hubby chuckles as he reads this, says I don't ever pick anything "normal), but again, just like the idea of having a bit more interest.  Painting them all the same color (white most likely) will tie them together and give a bit more uniformity.  Or, I might go find a bunch of vintage hooks.  See, I've obviously not made my mind up. (WHAT SHOULD I DO - please leave a comment and let me know your opinion!)

#2 - Paint the new (actually they're really old) school chairs I bought last weekend
I don't have a photo of them, but they look like this:


Actually, the ones I bought don't look this good.  But they are really awesome chairs, super sturdy, and vintage school chairs from the 1940's (see link to patent here).  The seats are globbed in paint and legs in weird spray paint.  I bought them for only $6 each at Tickled Pink Memorabilia Mall here in Louisville, KY.  Tony and Russ run the joint are are closed all day Saturday so they can go pick.  They are just the nicest couple of guys you ever want to meet, and price things so folks like me can put some money into a piece to make it shine.   So what is my plan for the chairs?  I think I'm going to give them a black laquer finish, then do a white stripe from the top to the bottom (chair back down the seat) in white - they'll kind of look like a shiny muscle car!  If they were for my house, I'd probably pick a less conventional color (Hubby chuckles), but I plan to sell these.

So, that's the plan and I also have a painting in my head that I REALLY want to attempt.  I never have time for it all, so I'll give you the update next week.  I also am playing volleyball tonight at our church, my son has a basketball game tomorrow, we are hitting church tomorrow, then we have a great night planned - more time at our church, Trivia Night!  Trivia Night is that fun night each year when I realize I'm really not very smart, and neither are my friends - but birds of a feather . . . .

HAVE A GREAT WEEKEND AND HAPPY VIERNES!

Tuesday, January 17, 2012

I'd Like To Thank The Academy, and Frog Tape, and Krylon Spray Paint . . . (I've been given an AWARD!)

So, guess what, I've been given an AWARD.  It's called the Liebster award which in German stands for Beloved.  Bloggers recognize "up and comers" with this award, and hey, I was recognized - how cool is that!

I was nominated by a blog called Vintage Restyled which is a fantastic blog by Shannon Gabor.  She has a booth at an antique mall and does amazing repurposed furniture and other design items.  Her painting teqniques are outstanding, especially her high quality distressing.  I've learned so much from her!  She does a great job showing her before and after projects, and also telling you HOW to do things!  Add her to your FAVORITES. 

Click HERE to be redirected to Vintage Restyled, tell Shannon I said HEY!  Also, I'll be nominating some up and coming blogs here later this week!


Get Yo' Organize On

Not sure about you, but my front hallway often looks like a bomb went off - like 5 of them.  The front hallway operates as a mud room, sports gear storage, shoe/backpack/coat dump site, office, mail sorting, and miscellaneous crap catcher.  One area I'm trying to improve is the mail organization.  I have a mail slot on my front door, so the mail is underfoot when you open the door each afternoon.  Then we pick it up and throw it on the front hallway table along with the newspaper, my purse, things to be signed for school, items to be filed, keys, an old sandwich, you get the picture.  Exhibit 1:


So my first project to correct this was to install some lucite/acrylic mailboxes along the entry.  I bought these from Target for only $2.99. 


It was actually very easy, I used a level to ensure they were straight and used Scotch Command Strips to hang them - they're super strong, you can move them if you change your mind, awesome product.


Then I added labels to each box so that I can quickly put things in their place.  If you don't own a label maker, you totally must - I get way more a kick out of using it than I should, but I love it and I think they're about $15-20 at Target, Walmart, Office Max.  For this application, it gives a much neater and sophisticated look to something that would probably be fairly sloppy looking if hand-written.

The boxes are: UNSORTED MAIL, SORTED MAIL, and MAGAZINES/CATALOGS.  


The SORTED MAIL box has some pretty file folders added for further sorting of bills to be paid, things to file, receipts for taxes, etc.


I think it turned out looking sleek and neat and will give me a CHANCE to stay a bit more organized and have a cleaner entry way.  More plans to come on getting coats/shoes/miscelaneous under control.  I'm also thinking of adding a few small hooks for keys, some sort of small bin that my hubs could put his wallet in and a heavy duty hook under these boxes for my purse.  Organized spaces are much easier to keep tidy.  (And you get to use a label maker!!!!)

Monday, January 16, 2012

Well kiss my brass!

So chrome tables like this one from CB2 are very much in style:


This baby costs $199 plus shipping.  However, you can find vintage brass versions like this quite frequently at thrift stores or on Craigslist:


Why would I show you this sad brass table?  Well you can turn it into a HAPPY chrome table with . . . . Easy Off Oven cleaner!  Who knew?  Not me, but this lady sure did.  Click on this LINK to the blog "Living in the 513" to see just how it's done.  Looks super easy and the results are UH.MAZING!  Check out the BEFORE and AFTER:

BEFORE


AFTER


I can't wait to try it out.  Oh crappy brass table I walk by all the time, where are you????

Sunday, January 15, 2012

The first step to recovery is admitting you have a problem

Hi. My name is Tricia. (Hi Tricia)  And I'm a design show junkie.  Boy am I ever, a new episode of Sarah's House (HGTV) on - damn, rollout a glass of wine and leave me alone for 30 minutes.  I love, love, love designs shows and really have since HGTV came on the air.  DIY channel is also a great one if you have it in your tv package. 

So today I want to feature a house that I LOOOOOOOOOOOOOOOOVE from one of those.  It was on DIY channel's show called "Family Under Construction" and it followed a family as they renovated a 120 year old home.  Their design asthetic is classic architecture with modern and industrial designs.  First of all, the series was great, it was 8-10 episodes and the the family was ADORABLE.  They're almost too cute in that they are all very pretty and even when the couple fights, they still look like they like eachother.  Not real life, but it's cool cause this stay at home mom who left the corporate world can DESIGN.  Come to think of it, not only are they a sweet, cute family, but they're super cool and edgy too. 

Not only did she design an amazing home, but they did a ton of projects themselves which I love.  CLICK HERE to go to House & Home's video that shows the AFTER photos.  I wish I had the before because they brought this baby a long way.

PS - if you're not sure which design shows are worth your time, here are my faves:

HGTV:
Sarah's House
Colorsplash and Colorsplash Miami
Candice Tells All
Secrets from a Stylist
Dear Genevieve

DIY Network:
DIY Addict
Family Under Construction
All the Crashers (Bath Crashers, House Crashers, Yard Crashers)