 |
| Original |
 |
| Make-over #1 |
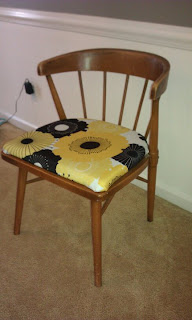
I really enjoyed that pattern and the punch of color. When I did this, I think the room was white with nothing on the walls, no painted furniture, etc. Now, it's just a bit too much. A while back I found this great large houndstooth fabric and knew I wanted to recover the chairs with it. Houndstooth on it's own is a very traditional pattern, but the large over-sized pattern on this fabric makes it more modern and fun. Plus, I have lots of splashes of black and white in my dining room and living room, so it's a nice add. Black and white always add a bit of formality. This is a heavy duty "cotton duck" fabric.
Another reason to recover the yellow/black pattern is that they had gotten pretty dingy - we eat in there (I know - in a dining room, crazy!), we do art projects, school projects, paint, etc. So, these get lots of wear. Which is why I added a coat of Scotch Card fabric protector to the seats when I finished them. I'm going to do another couple coats. And at the end of the day, total cost for this project was around $15 for fabric, so if they get ruined somehow, I'll just recover them again. See my dingy before cushion.
If you've never recovered padded seat cushions before, try it, it's super easy. See the steps below. I use a regular old staple gun from Home Depot. They are cheap and handy for lots of projects! If you're not sure which one to buy, just tell the guy in the orange apron what you need it for, and they'll direct you to the right thing.
 |
| First, unscrew the screws that hold the seat to the frame. You can see two at the top and two on the bottom corners. |
 |
| Cut your fabric to where you can pull it over the pad on each side by about 2-3 inches.(note, I pulled off the yellow and black fabric first b/c I was afraid it would show through) |
 |
| Finish stapling all around, being careful to not have any areas that pucker. On the corners, the more staples the better. |
 |
| Make sure to keep pulling and stapling at the corners or you will get a "bunchy" look that you won't like! |
It's also kind of cool to see what other fabric was there before. There are two fabrics on the seats underneath the one I just put on.
 |
| Looks like the brown/gold weave fabric was the original. (excuse my chunky monkey fingers in this photo) |
Now for the fun part, TA-DAHHHHH:
 |
| BEFORE |
 |
| AFTER |
 |
| BEFORE |
 |
| AFTER |
More AFTERS (because I adore, love, have tears in my eyes over these chairs and I am trying to take more pictures with my camera!)
 |
| Max trying out the new chairs |
This is truly a project that ANYONE can do, and look at the result - I love projects like this that makes you so happy when you're finished. I went back in the dining room to see them about 10 times last night. And staple guns are fun. HAVE A GREAT WEEK!


Love the fabric! It's an easy process that yields great results!!
ReplyDelete